Create Oracle Function without Fn CLI (Using Docker) in NodeJS
Oracle Function(Function) is a fully managed, multi-tenant, highly scalable, on-demand, Functions-as-a-Service platform. It is built on enterprise-grade Oracle Cloud Infrastructure(OCI) and powered by the Fn Project open source engine.

The serverless and elastic architecture of Oracle Functions means there’s no infrastructure administration or software administration for you to perform. You don’t provision or maintain compute instances, and operating system software patches and upgrades are applied automatically. Oracle Functions simply ensures your app is highly-available, scalable, secure, and monitored. With Oracle Functions, you can write code in Java, Python, Node, Go, and Ruby (and for advanced use cases, bring your own Dockerfile, and Graal VM). You can then deploy your code, call it directly or trigger it in response to events, and get billed only for the resources consumed during the execution.
Now there are multiple ways in which a Function can be created in OCI as listed below :
- Using the OCI Console.
- Using the Fn-cli and OCI-cli in your local machine.
- Using Cloud Shell.
- Using Custom Dockerfile.
Now, consider a use case, where you do not have admin rights on your local machine and you cannot install the Fn-cli and OCI-cli on it. In this scenario you would need to use the OCI CloudShell. But here also, you would need to write the entire function code in the VIM editor in CloudShell as you will not be able to install any IDE. This brings us a difficult situation, as we all know how hard it is to code in pure text without the help of any IDE or intellisense.
In this article we will be learning exactly how to overcome the difficulty mentioned above.
To accomplish this we need to understand how exactly fn creates / deploys a function. Broadly speaking, deployment has the following steps:
- Fn Project CLI “fn deploy” command starts the process.
- Fn builds a Docker image (along with some meta data) from the func.yaml file.
- Pushes the generated Docker image to the Docker Registry.
- Adds the function to the application in OCI.
Refer to this documentation for more information.
From the above breakdown, we can understand that we do not need Docker installed to create a function. Instead on applying the “fn deploy” or “fn build” command, the fn-cli builds the Docker image internally using metadata from the func.yaml file present in the classpath. Below is the default Dockerfile generated by fn-cli using the func.yaml file for a sample hello-world application in NodeJS.
FROM fnproject/node:dev as build-stage
WORKDIR /function
ADD package.json /function/
RUN npm install

FROM fnproject/node
WORKDIR /function
ADD . /function/
COPY --from=build-stage /function/node_modules/ /function/node_modules/
ENTRYPOINT ["node", "func.js"]
If we take a close look at the default Dockerfile, we can see that fn runtime pushes all content to a directory named “/function” inside the Docker image.
Now that we understand how fn runtime creates a Docker image, we can mimic the process ourselves in a custom Dockerfile and use the Docker Runtime in our local machine to generate a Docker image on the same lines as generated by fn runtime itself. The diagram below illustrates this :

As we can see in the image above, we do not need any of fn-cli or oci-cli on our local machines. Only if we have Docker installed in our local machines, we can leverage the power of any IDE like VS Code to write our NodeJS serverless code and use Docker cli to build the image. Once the image is built we can push the image to Oracle Cloud Infrastructure Registry (OCIR), which is the Docker repository for all Oracle Cloud resources. This will enable us to use any IDE, which is very efficient while coding in any language and also enables us to strategize and resolve any advanced use cases that may arise. In a way making code development even more container native as there is no need to use any kind of SDKs.
Enough of theory banter, lets see how it works in reality :)
Using your favourite IDE, let us create a new NodeJS project and name it “NodeFnSample-Docker”:
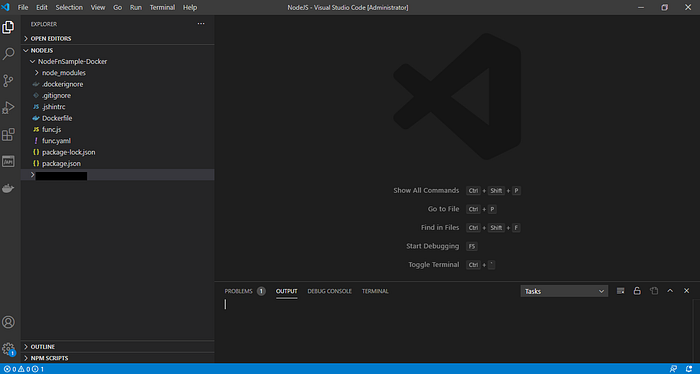
Now, we need to mimic the way fn runtime creates a function directory structure. Essentially, a NodeJS function has the following files in its root directory:
- func.js
- func.yaml
- package.json
Lets go ahead and create all these 3 files. Firstly create a file called “func.js” and write the following code in it:
const fdk = require('@fnproject/fdk');fdk.handle(async (input) => {
    let name = "World";    if(input && input.name){
        name = input.name;
    }

    return {
        'response': "Hello "+ name,
        'currentTime': currentDateTime()
    }
})/**
 * Function to get the current DateTime
 * @returns current Date
 */
function currentDateTime() {
    return new Date();
}
Now lets create the “func.yaml” file with the following code in it. This is the metadata file:
schema_version: 20180708
name: node-sample-docker-fn
version: 0.0.1
runtime: docker
format: http-stream
memory: 512
timeout: 120
idle_timeout: 1800
Notice that we have specified the “runtime” attribute as “docker”. This is important as it tells the fn runtime that this function is based on a pre created Docker image and that fn does not need to build an image.
Next we will create the “package.json” file which is basically a metadata file for any NodeJS project. Below is the content of the file in our application:
{
  "name": "node-sample-docker-fn",
  "version": "0.0.1",
  "description": "NodeJS Code for Oracle Fn to be created with Docker Image",
  "main": "func.js",
  "author": "Pathikreet Dutta",
  "license": "Apache-2.0",
  "dependencies": {
    "@fnproject/fdk": ">=0.0.19",
    "fs": "0.0.1-security",
    "node-forge": "^0.10.0"
  },
  "bundledDependencies": [
    "node-forge",
    "fs"
  ],
  "config": {
    "bin": "bin",
    "name": "NodeDockerSampleFn"
  }
}
Now if you need to use any additional modules for development, then you can very well add those modules here in the package.json, just like you would do in your usual NodeJS projects.
Once the above 3 files are created, now we will be doing the main task that is needed for the above design principle to work. We will now create the “Dockerfile” with the below content:
FROM node:14#Create a working directory
WORKDIR /function# Install app dependencies
# A wildcard is used to ensure both package.json AND package-lock.json are copied
# where available (npm@5+)
COPY package*.json ./
RUN npm install# Copy all artifacts including generated ones
COPY . /function/CMD [ "node", "func.js" ]
With this Dockerfile we are basically doing what fn runtime does internally. Now build an image from this codebase with following command:
docker build --pull --rm -f "NodeFnSample-Docker\Dockerfile" -t iad.ocir.io/<tenancy-namespace>/<OCIR-repo>/node-sample-docker-fn:0.0.1You should have Docker runtime installed and running on your local machine before executing the above command
If you take a close look at the docker command, you would notice that the image section is little different than usual. The general docker build image command syntax is as follows:
docker build --pull --rm -f <Dockerfile> -t <image>:<tag>As we are using OCIR as our Docker repository, the Image syntax for OCIR is as follows:
<region-prefix>.ocir.io/<tenancy-namespace>/<OCIR-repo>/<image-name>:<tag>One the image is built and available in your local machine, you can then login to OCIR from your local machine and push the image to the repo.
To work with OCIR, you would first need to generate an Auth Token from the OCI Console. Please refer here for more information.
Login to Docker
docker login <region-code>.ocir.io (in my case docker login iad.ocir.io)
username: <tenancy-namespace>/user (where <tenancy-namespace> is the auto-generated Object Storage namespace string of the tenancy in which to create repositories (as shown on the Tenancy Information page) and password is the generated Auth Token.
docker push iad.ocir.io/<tenancy-namespace>/<OCIR_repo>/node-sample-docker-fn:0.0.1On successfully pushing the image to OCIR, you can then login to OCIR and see the image listed there as below:
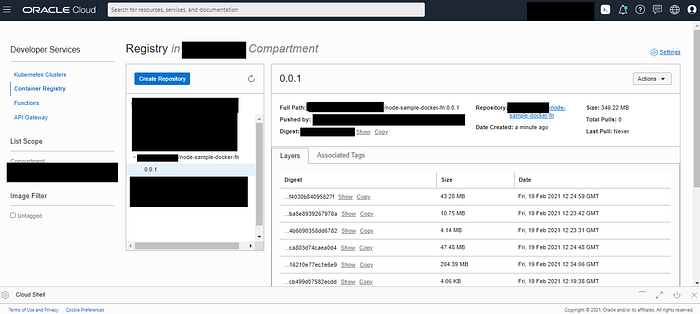
Once the Image is pushed and available in OCIR, we can then refer to Creating Functions from Existing Docker Images to create a function in OCI.
Out of the 2 ways described in the above Oracle Doc, i personally like to use the OCI CloudShell to create my functions using the following command:
fn create function <app-name> <function-name> iad.ocir.io/<tenancy-namespace>/<OCIR_repo>/node-sample-docker-fn:0.0.1<function-name> = node-sample-docker-fn
Now your function is created and ready to be invoked using any method that you prefer. Lets try to invoke the newly created function from OCI CloudShell itself using the following command:
echo '{"name": "Pathikreet"}' | fn invoke <app-name> node-sample-docker-fn --content-type application/json | jqThe response from function is below:
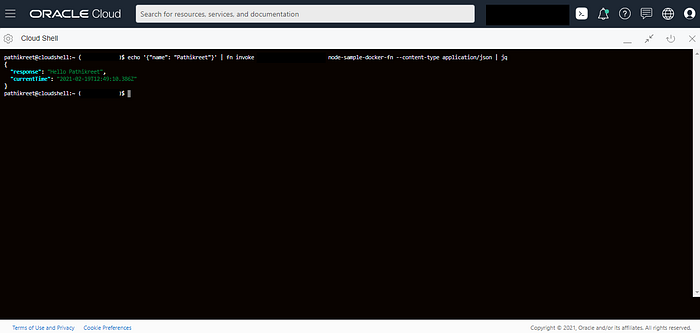
And voila, we did achieve to create a function without the hassle of installing oci-cli, fn-cli and also we achieved our goal of being completely agnostic of technology in our design principle. Although we have showcased a NodeJS example here, you can very well write the code in any language of your choice, as long as you can create the Dockerfile on the same lines as created above. This was our serverless code is both language and platform agnostic.
Sample Code : https://github.com/pathikreet/ocifunctions/tree/master/NodeJS/NodeFnSample-Docker
Happy Learning !!!